在Centos 7 上安装Zabbix监控
一、关闭seLinux和iptables && 安装Zabbix rpm包仓库 && 安装zabbix-server-MySQL和zabbix-web-mysql && 安装并且启动mysql5.6及 数据库信息安全初始化、设置数据库root密码等
[root@localhost ~]# systemctl stop firewalld.service && systemctl disable firewalld.service && sed -i 's/SELINUX=enforcing/SELINUX=disabled/' /etc/selinux/config && grep SELINUX=disabled /etc/selinux/config && setenforce 0 && rpm -vhi http://repo.zabbix.com/zabbix/3.5/rhel/7/x86_64/zabbix-release-3.5-1.el7.noarch.rpm && yum install -y zabbix-server-mysql zabbix-web-mysql && rpm -ivh http://repo.mysql.com/yum/mysql-5.6-community/el/6/x86_64/mysql-community-release-el6-5.noarch.rpm && yum install -y mysql-community-server && systemctl start mysqld && /sbin/chkconfig mysqld on && mysql_secure_installation<— # && /sbin/chkconfig mysqld on #开机启动 && mysql_secure_installation #数据库安全初始化、设置数据库root密码等 && 回车—y—y等等
二、创建zabbix数据库,创建zabbix账号、创建zabbix密码
[root@localhost ~]#   mysql -uroot -p123456789   <——— # mysql -u系统帐号  -p系统密码
mysql>   create database zabbix character set utf8 collate utf8_bin;
mysql>   grant all privileges on zabbix.* to 'zabbix'@'localhost' identified by 'zabbix';
mysql>   flush privileges;
mysql>   quit;
三、导入默认的zabbix数据库信息
[root@localhost ~]# zcat /usr/share/doc/zabbix-server-mysql*/create.sql.gz | mysql zabbix -uzabbix -pzabbix四、修改zabbix_server.conf的配置文件
[root@localhost ~]#   vi /etc/zabbix/zabbix_server.conf
    DBHost=localhost
    DBName=zabbix
    DBUser=zabbix
    DBPassword=zabbix
查看zabbix_server.conf的配置文件,确定在“第四步”里设置没有错可以跳过本步骤
[root@localhost ~]#   grep ^DB /etc/zabbix/zabbix_server.conf
DBHost=localhost
DBName=zabbix
DBUser=zabbix
DBPassword=zabbix
五、修改配置文件/etc/httpd/conf.d/zabbix.conf,时区改成 Asia/Shanghai
[root@localhost ~]#   vi /etc/httpd/conf.d/zabbix.conf
    php_value max_execution_time 300
    php_value memory_limit 128M
    php_value post_max_size 16M
    php_value upload_max_filesize 2M
    php_value max_input_time 300
    php_value always_populate_raw_post_data -1
    php_value date.timezone Asia/Shanghai
六、启动apache/zabbix-server服务并设置为开机启动
[root@localhost ~]#   systemctl start httpd
[root@localhost ~]#   systemctl enable httpd
[root@localhost ~]#   netstat -an |grep 80
tcp        0      0 192.168.133.148:80        0.0.0.0:*               LISTEN
[root@localhost ~]#   systemctl start zabbix-server
[root@localhost ~]#   systemctl enable zabbix-server
备注:
systemctl start zabbix-server zabbix-agent httpd <——— # 这个命令是zabbix官网网站的,在里不用在输入。上面已经有同类的命令了
systemctl enable zabbix-server zabbix-agent httpd <——— # 这个命令是zabbix官网网站的,在里不用在输入。上面已经有同类的命令了查看zabbix-server日志
[root@localhost ~]#   tailf  /var/log/zabbix/zabbix_server.log
  7708:20180323:204216.578 Jabber notifications:      YES
  7708:20180323:204216.578 Ez Texting notifications:  YES
  7708:20180323:204216.578 ODBC:                      YES
  7708:20180323:204216.578 SSH2 support:              YES
  7708:20180323:204216.578 IPv6 support:              YES
  7708:20180323:204216.578 TLS support:               YES
  7708:20180323:204216.578 ******************************
  7708:20180323:204216.578 using configuration file: /etc/zabbix/zabbix_server.conf
  7708:20180323:204216.578 cannot set resource limit: [13] Permission denied
  7708:20180323:204216.578 cannot disable core dump, exiting...
  7724:20180323:204226.596 Starting Zabbix Server. Zabbix 3.0.15 (revision 78010).
  7724:20180323:204226.596 ****** Enabled features ******
  7724:20180323:204226.596 SNMP monitoring:           YES
  7724:20180323:204226.596 IPMI monitoring:           YES
  7724:20180323:204226.596 Web monitoring:            YES
  7724:20180323:204226.596 VMware monitoring:         YES
  7724:20180323:204226.596 SMTP authentication:       YES
  7724:20180323:204226.596 Jabber notifications:      YES
  7724:20180323:204226.596 Ez Texting notifications:  YES
  7724:20180323:204226.596 ODBC:                      YES
  7724:20180323:204226.596 SSH2 support:              YES
  7724:20180323:204226.596 IPv6 support:              YES
  7724:20180323:204226.596 TLS support:               YES
  7724:20180323:204226.596 ******************************
  7724:20180323:204226.596 using configuration file: /etc/zabbix/zabbix_server.conf
  7724:20180323:204226.596 cannot set resource limit: [13] Permission denied
  7724:20180323:204226.596 cannot disable core dump, exiting...
zabbix-server的web目录
[root@localhost ~]# ls /usr/share/zabbix
actionconf.php chart2.php hostinventoriesoverview.php maintenance.php services.php
adm.gui.php chart3.php hostinventories.php map.import.php setup.php.bak
adm.housekeeper.php chart4.php host_prototypes.php map.php slideconf.php
adm.iconmapping.php chart5.php host_screen.php overview.php slides.php
adm.images.php chart6.php hosts.php popup_httpstep.php srv_status.php
adm.Macros.php chart7.php httpconf.php popup_media.php styles
adm.other.php chart.php httpdetails.php popup.php sysmap.php
adm.regexps.php charts.php image.php popup_right.php sysmaps.php
adm.triggerdisplayoptions.php conf images popup_trexpr.php templates.php
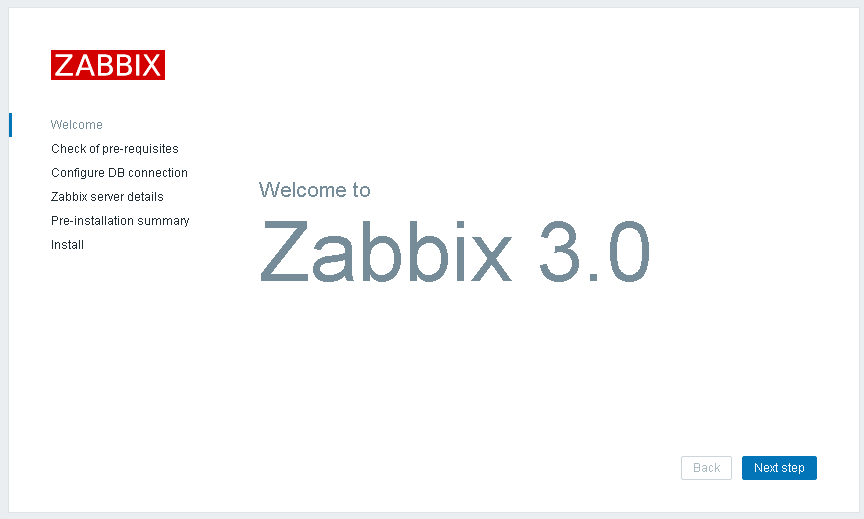
adm.triggerseverities.php conf.import.php img profile.php toptriggers.php七,访问网站,例如:http://本机IP/zabbix,如下图所示:
八,选择下一步,Check of pre-requisites,如图所示:
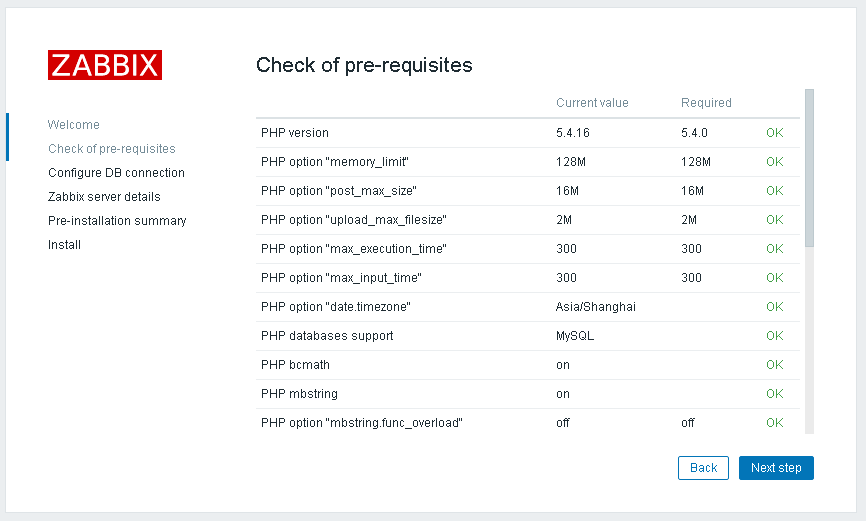 <—- # 要是时区NO状态,重启下apache服务。
 systemctl restart httpd
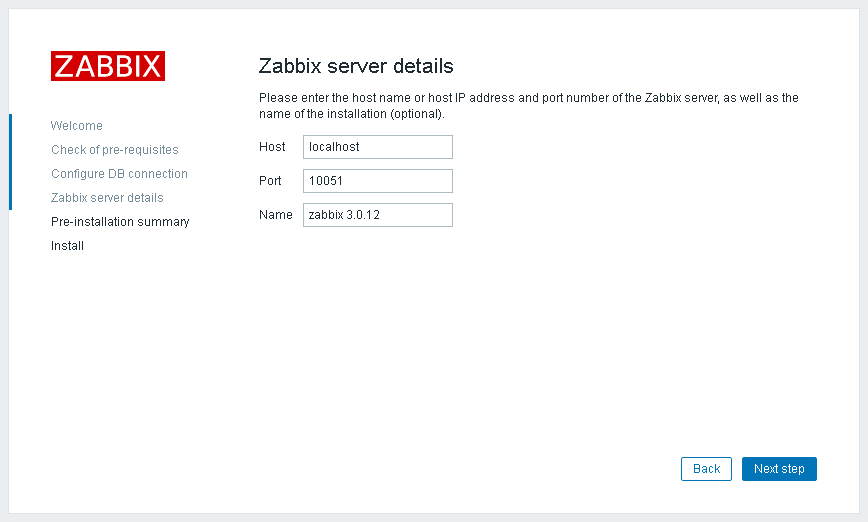
九,选择下一步,配置zabbix server detail,如下图所示:
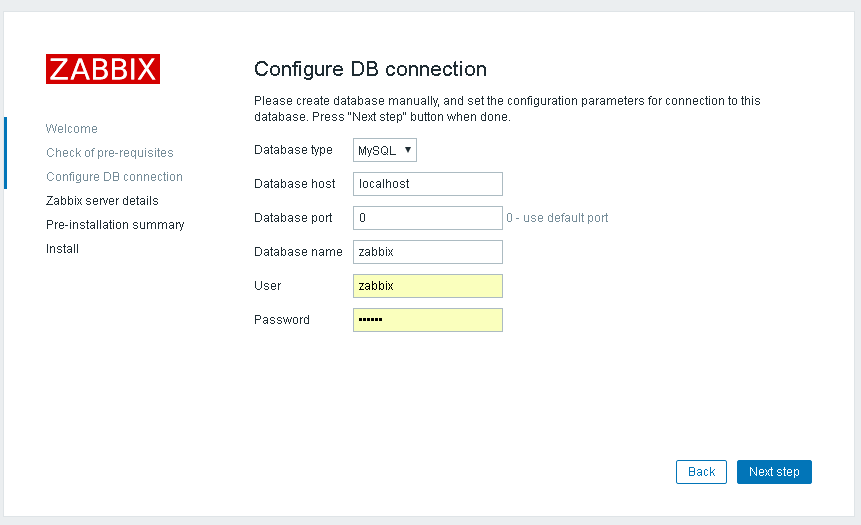
十,选择下一步,配置zabbix server detail,如下图所示:
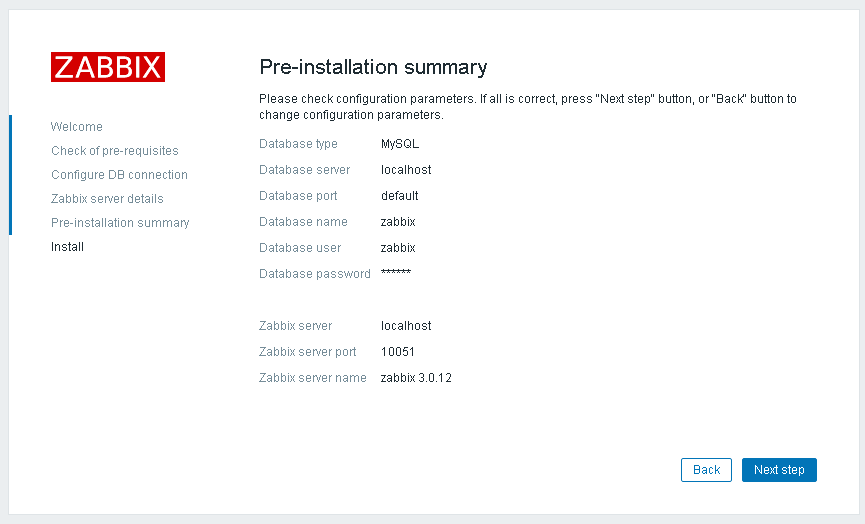
十一:点击下一步,便完成安装,安装完成的界面如下图所示:
十二,安装完成,如下图所示:
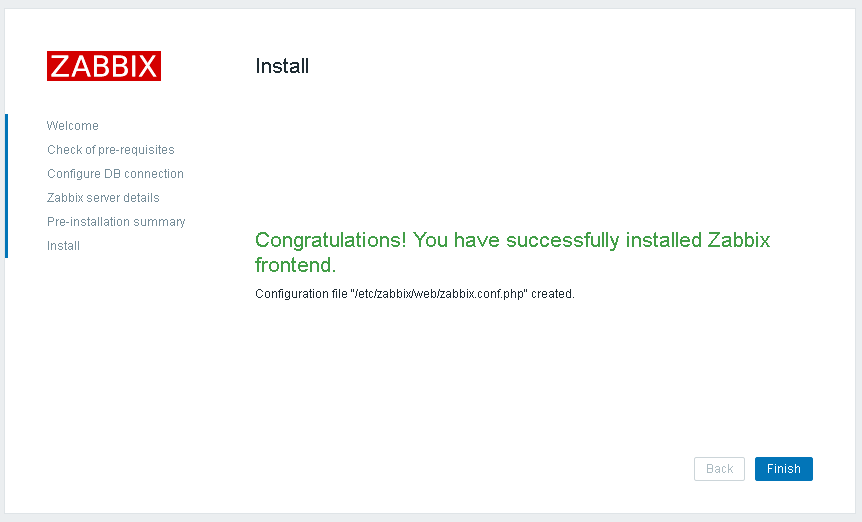
根据提示可以看到上面图形界面的操作都写到一个配置文件中
[root@localhost ~]# more /etc/zabbix/web/zabbix.conf.php
<?php // Zabbix GUI configuration file.
global $DB;
$DB['TYPE'] = 'MYSQL';
$DB['SERVER'] = 'localhost';
$DB['PORT'] = '0';
$DB['DATABASE'] = 'zabbix';
$DB['USER'] = 'zabbix';
$DB['PASSWORD'] = 'zabbix'; // Schema name. Used for IBM DB2 and PostgreSQL.
$DB['SCHEMA'] = '';
$ZBX_SERVER = 'localhost';
$ZBX_SERVER_PORT = '10051';
$ZBX_SERVER_NAME = 'zabbix';
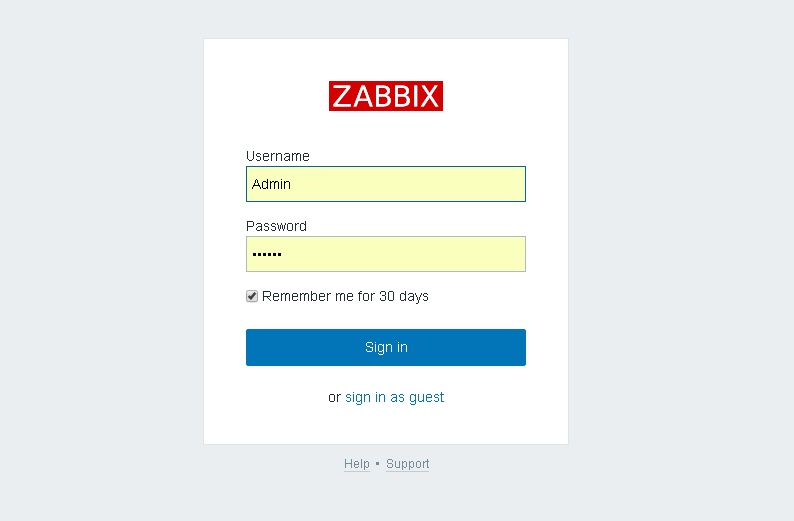
$IMAGE_FORMAT_DEFAULT = IMAGE_FORMAT_PNG;十三:Zabbix·server的默认账号Admin 密码zabbix,如图所示:
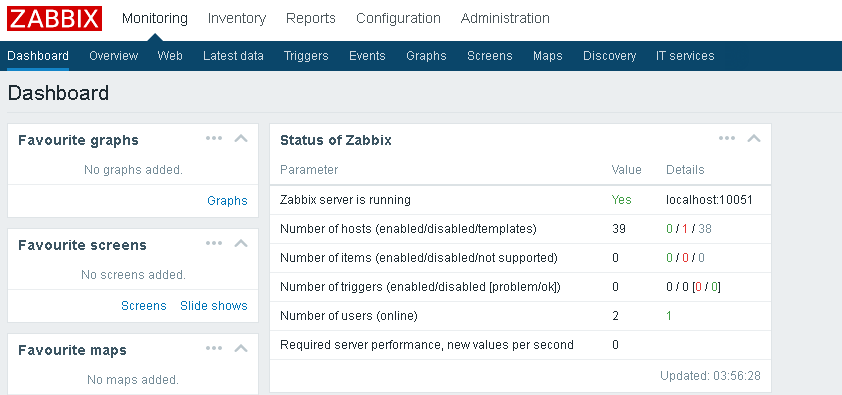
十四,默认登陆首页,如下图所示:
十五,移除或改名web目录下面的setup.php文件
[root@localhost ~]#   cd /usr/share/zabbix && mv setup.php setup.php.bak    <——— # 把`setup.php`修改为`setup.php.bak`文件
[root@localhost zabbix]#   pwd /usr/share/zabbix
十六,更改web登陆的Admin默认密码
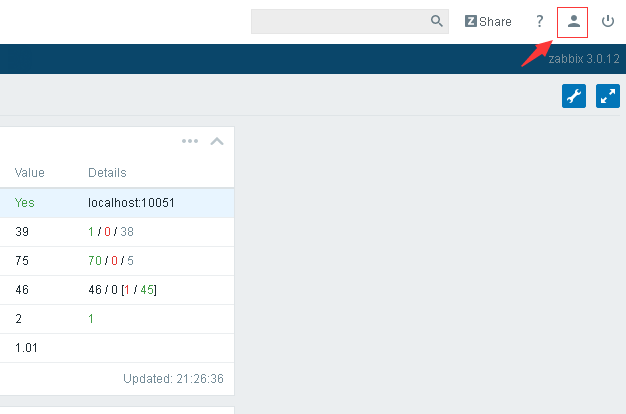
十七,设置新的密码,这里也可以设置界面的主题、语言和登陆后显示的默认界面等

十八,安装ntp && 设置开机自启 && 开始运行 && 同步下时间
yum -y install ntp && systemctl enable ntpd && systemctl start ntpd && ntpdate -u cn.pool.ntp.org十九,解决zabbix中文乱码问题。
先把 /usr/share/zabbix/fonts/ 里的 graphfont.ttf 复制一份,然后把自己喜欢的中文字体上传到 /usr/share/zabbix/fonts 目录下,覆盖graphfont.ttf该文件。
至此安装部分结束。
apache
启动 systemctl start httpd
停止 systemctl stop httpd
重启 systemctl restart httpd
mysql
启动 systemctl start mysqld
停止 systemctl stop mysqld
重启 systemctl restart mysqld
php-fpm
启动 systemctl start php-fpm
停止 systemctl stop php-fpm
重启 systemctl restart php-fpm
nginx
启动 systemctl start nginx
停止 systemctl stop nginx
重启 systemctl restart nginx